Troubleshooting No Spark
Your new engine won't start or your old engine suddenly quit and won't
run.
You're pretty sure there is no spark but how do you determine what the exact
cause is?
Definitely do a test for spark at the plugs. Remove one of the plug wires from a plug and hold it near grounded metal. (If the plug end has a long insulated shroud, you may have to improvise to get ground close enough to the end of the wire.) Have someone crank the engine while you watch for spark. If you get an 1/8" or so of spark, that should be enough to fire.
If you don't have a helper, you can do it this way:
Pull the hi-tension lead out of the distributor cap and hold near ground.
With ignition On, turn the engine pulley CW past the TDC mark. You
should get some kind of spark, although if you turn slowly the spark may
be weak.
Check the distributor cap inside for signs of cracks or carbon arc tracks.
Also, check to see that the little carbon contact for the center terminal
is in place; without that you can have spark but it won't get to any plug
wires!
It's rare, but a rotor with an internal short or carbon tracks on the surface can kill the spark before it even gets to the cap.
Still stumped? Time to test the ignition coil circuit.

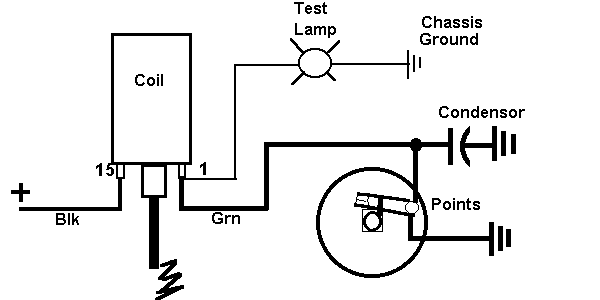
Quick review: The coil is a big transformer with a magnetic core. Current from the battery goes into the primary winding on Terminal #15. That same current goes out Terminal #1 and through the point contacts. This current creates a magnetic field in the core of the coil.
When the points open, the magnetic field in the coil core collapses, creating a high voltage in the seconday winding, which is fed to the center Hi-tension terminal. The condensor across the points helps to control arcing at the points, which would soon destroy them, and also makes the spark a higher voltage by creating a resonant (ringing) circuit with the coil winding. All we really need to know is that without the condensor, the spark would be pretty weak.
Troubleshooting: You can find out quite a lot about the coil circuit
with very basic tools. A voltmeter is helpful (I prefer the older
analog meter with a needle over the digital ones because changes in readings
are more easily seen.)
If you don't have a meter handy, a simple test lamp will do just as well.
If your car is 12 volt, use a 12 volt bulb; if 6 volt, use a 6 volt
bulb. Put some wires on the bulb, maybe with alligator clips, and
you're in business.
Connect the tester (meter or bulb) from ground (engine case) to Terminal #15 on the coil. Never mind what the actual markings on the coil say; connect to the terminal which has the thick Black wire from the main harness on it. I say never mind the markings on the coil because someone may have swapped wires around which could lead you astray.
The tester should show 12 volts (or 6v). If it doesn't, there is no power from the Ignition Switch. Track that down (bad switch?). Incidentally, VW never put any fuses in the Ignition circuit; so don't go looking for blown fuses.
Double check that there is power at Terminal #15 while cranking the engine with the key. This is important because sometimes power will be lost while cranking due to a contact failure inside the ignition switch.
OK, you have power going to the coil. Now, hook
the tester from ground to Terminal #1 on the coil (where the Green wire from
the points connects).
Leave the Hi-tension lead out of the cap. With ignition On, turn the
pulley by hand (or have someone crank the engine). The tester should
go On and Off twice each revolution. If it does that, you
should get spark.
If the tester stays ON while cranking, the points are not closing.
Watch them while turning the pulley to see if they appear to close.
If they do, there may be a surface film on the points or the points
are eroded and pitted. Replace the points. I strongly recommend using
Bosch points as many of the off-brand points give very poor life.
In a pinch, you might lightly file the points.
When replacing points, be sure to put a tiny amount of grease on the cam
lobes or else the fiber rubbing block will rapidly wear and change the point
gap.
One other rare cause of an "open points" condition is failure of the tiny braided pigtail lead which grounds the advance plate. If the pigtail is broken, the advance plate may only be intermittently grounded. This will cause loss of spark as the advance plate moves or maybe no spark at any time. (There is no pigtail on distributors which have no vacuum advance.)
If the tester stays OFF while cranking, there are 3 possibilities:
Points shorted (stuck closed).
Condensor shorted.
Coil open.
Take the Green points wire off the coil terminal. If the tester now goes ON , either the points or the condensor is shorted. Replace both.
If removing the Green wire still did not turn the tester ON , the
coil may be open.
Double check that there is still power to Terminal #1 on the coil. Also
look to make sure that there are not any other wires connected to Terminal
#1.
(Sometimes, someone will mistakenly connect the Backup light wire to Terminal
#1; this will cause no spark when in Reverse!)
Replace the coil if the above test shows the coil open.