6 Volt / 12 Volt ??
US VW's had 6 Volt systems up through the 1966 model year. Often, it's desirable to convert these cars to a 12 Volt system to have brighter lighting, better starting or in order to add modern sound systems. Of course, if originality is a concern, you would want to keep the old 6 Volt system working.
This article goes into what's needed for the conversion and pitfalls to watch out for.
Here's what's needed for a typical car:
12V Generator or Alternator (and matching regulator)
You also need the oil stand to fit either Generator or Alternator.
Kits are available for Alternator conversions that have all the hardware.
Present-day alternators are internally regulated, so there is no worry
about getting the right regulator.
You may need the late-style fuel pump with an alternator conversion. This pump is angled in such a way that it makes room for the alternator. The carburetor accelerator pump linkage can be a problem too as it will interefere with the alternator. Some folks grind a small hunk out of the alternator casting or raise the carb on a spacer block. Better is to simply flop the linkage upside down (this is what VW did).
Other 12 Volt items you may need:
12V Coil (and condensor).
12V idle cut-off solenoid for carb (and 12V choke).
12V Wiper motor (or voltage reducing kit).
12V Horn.
12V Turn signal flasher.
12V Headlight dimmer ('66 only; earlier cars had a foot dimmer switch).
12V Bulbs (ALL of them; don't forget the speedo lights and the interior
light).
12V Radio.
The starter motor is another problem. You can't just swap in a 12V starter.
Here's the reason:
With the advent of the 12 Volt system in '67, VW changed the number of teeth
on the flywheel from 109 to 130. This made the flywheel bigger in diameter
(by about .160"). That meant changing the pinion gear on the
starter, which also meant reducing the size of the starter pinion shaft,
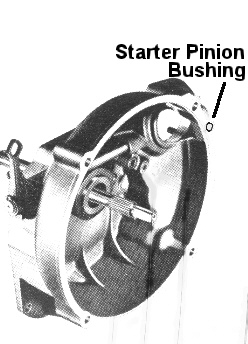
which meant changing the pinion shaft bushing in the bellhousing! They
also reduced the bore in the bellhousing for the bushing. The pinion
shaft was reduced from .491" to .432" and the bore in the bellhousing went
from .652" to .534". (These numbers are approximate; don't use them
for machining stock.)
Most folks leave the 6V starter in place and run it on 12V. It will survive this for a surprisingly long time if you keep the duration of cranking short. You can swap the solenoid on the starter for a 12V unit, if desired. That will lower the current drawn by the solenoid.
In most situations, if you're keeping the original 1200/1300 engine, re-using the old 6 Volt starter is the best way to go.
If you're putting a later 1600 (or larger) engine in, you must either bolt on a 6 Volt flywheel or change to a 12 Volt starter.
If you do decide to use a 12V starter, you have to use the 12V version of the flywheel and machine out (grind) the bellhousing for the larger diameter.
NOTE: The 6 Volt flywheel will fit on the 1600 crank but the later 12 Volt flywheel won't fit the earlier 1200 crank! Be sure to check the crank end-play if you swap flywheels.
If you do change the starter, you must also change the pinion bushing in the bellhousing.

With the engine out, it's easy to tap the old bushing out from the engine side. Special replacement bushings are available to use a 12V starter on an old 6V bellhousing and also to be able to use a 6V starter on a newer 12V bellhousing. Be sure to get the correct one.
If going to a 12 Volt starter, try to find one from an auto-stick car. These didn't use a bushing in the bellhousing. These starters are also more powerful.
Clutches and pressure plates:
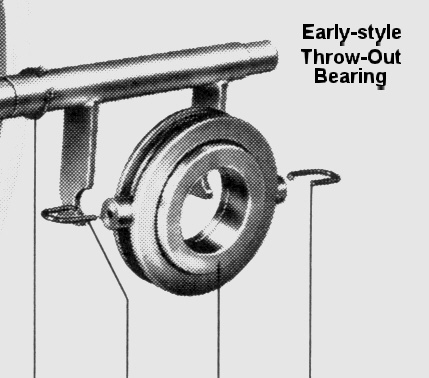
This issue isn't directly related to a 12 Volt conversion but it often pops up. Beginning with the '71 models, the throw-out bearing was completely re-designed. On earlier cars (both swing-axle and IRS), the throw-out bearing was held onto the shaft with 2 U-shaped clips and the bearing was free to pivot on its stubby pins.

The new bearing is more firmly anchored by new clips and is supported by a guide sleeve which runs through the center of the bearing.


The bearing now has a wide thrust surface built into it. This eliminated the need for the thrust ring on the pressure plate.
If you try to mix the new bearing with the old pressure plate or vice versa, it won't work and you'll have trouble adjusting the cable or may damage the clutch or release shaft.
![]() Pressure plates for use with late-style throw-out bearing.
Pressure plates for use with late-style throw-out bearing.
So, if you're installing a later (1600) engine into an early car, you may have to replace the pressure plate with an early one which has the thrust ring.
![]() Pressure plate used with early-style throw-out bearings.
Pressure plate used with early-style throw-out bearings.